For nine posts we have worked through the anatomy, the physiology, and just about everything that can go wrong with the gallbladder. This post starts the surgery section of the series. I am going to walk you through the operation in the order it happens, the same way I walk through it in the office. This is the mechanical post: what gets done, through which incision, and why (Figure 1). How I safely identify your anatomy before anything is clipped will be discussed next week.
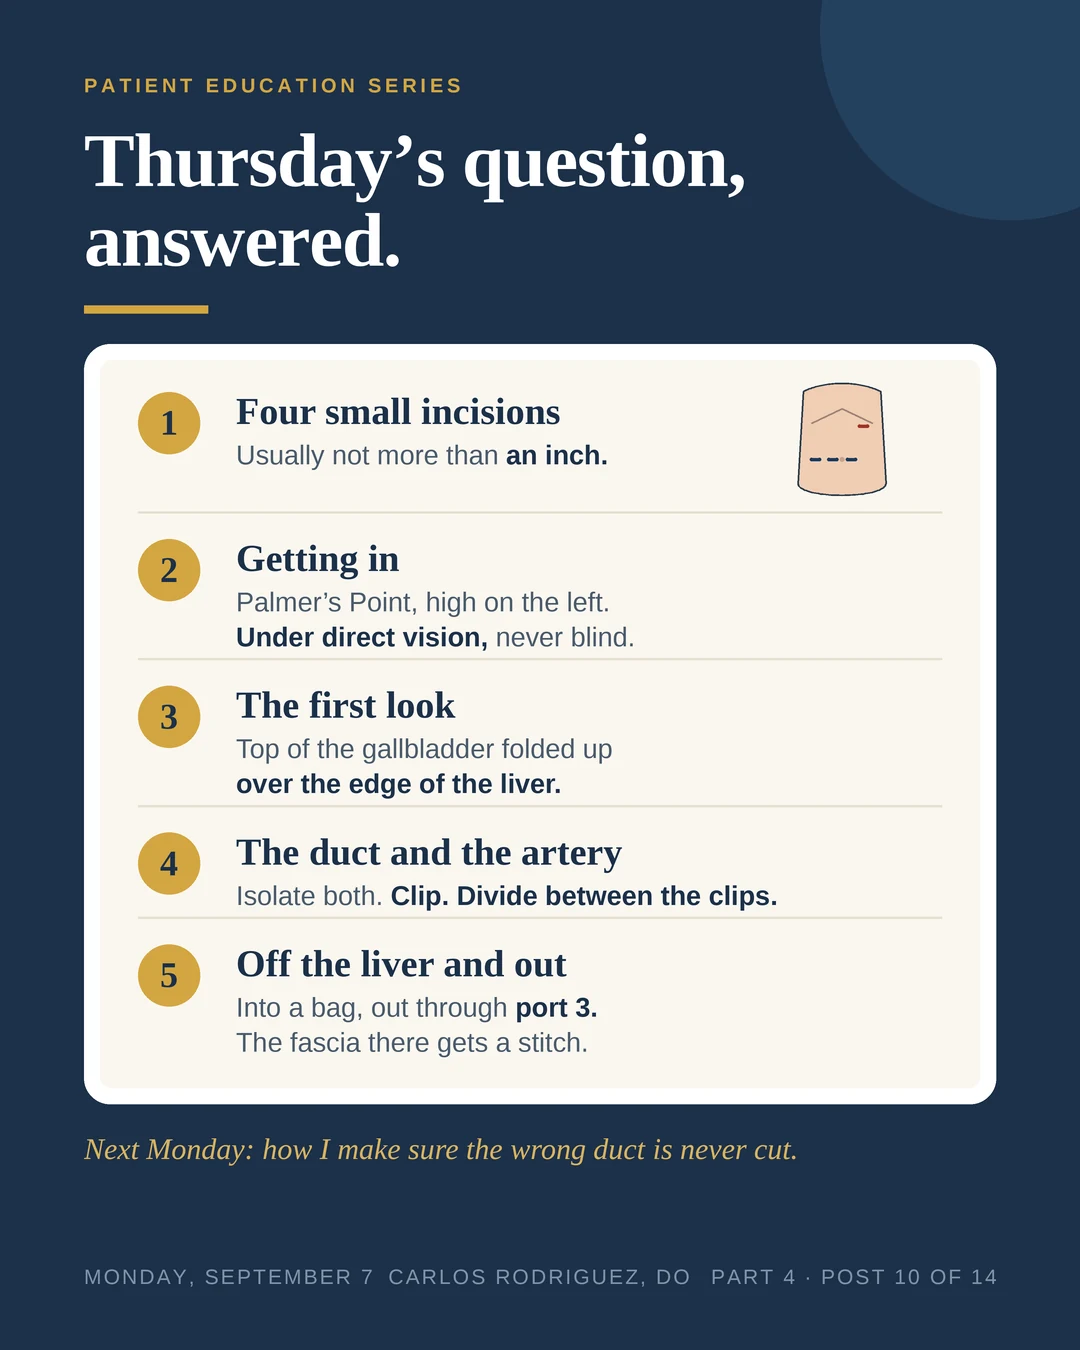
Before the first cut
The operation is done under general anesthesia. You are fully asleep, and a breathing tube protects your airway for the length of the case.
Once you are asleep, we position you. You lie on your back.
The abdomen is not a hollow space. The organs sit against each other. To operate through small incisions, we have to create room, and we do that with carbon dioxide gas. The gas lifts the abdominal wall away from the organs, which creates a working space and a clear view, at a pressure of about 15 mm Hg.¹ Carbon dioxide is used because your body absorbs it and clears it through your lungs.
This is also the reason some patients feel shoulder pain for a day or two afterward. The carbon dioxide can become trapped under the diaphragm, irritating the nerve that innervates the diaphragm. This nerve runs through the back of your chest underneath your shoulder blade. The trapped gas irritates the diaphragm and the nerve, and that irritation causes referred shoulder pain. It is not a shoulder problem. Walking around after surgery helps the body reabsorb the trapped gas.
Step 1: Four small incisions
A standard laparoscopic gallbladder operation uses four incisions: one at or just above the navel for the camera, one below the breastbone, and two on the right side below the ribs.¹
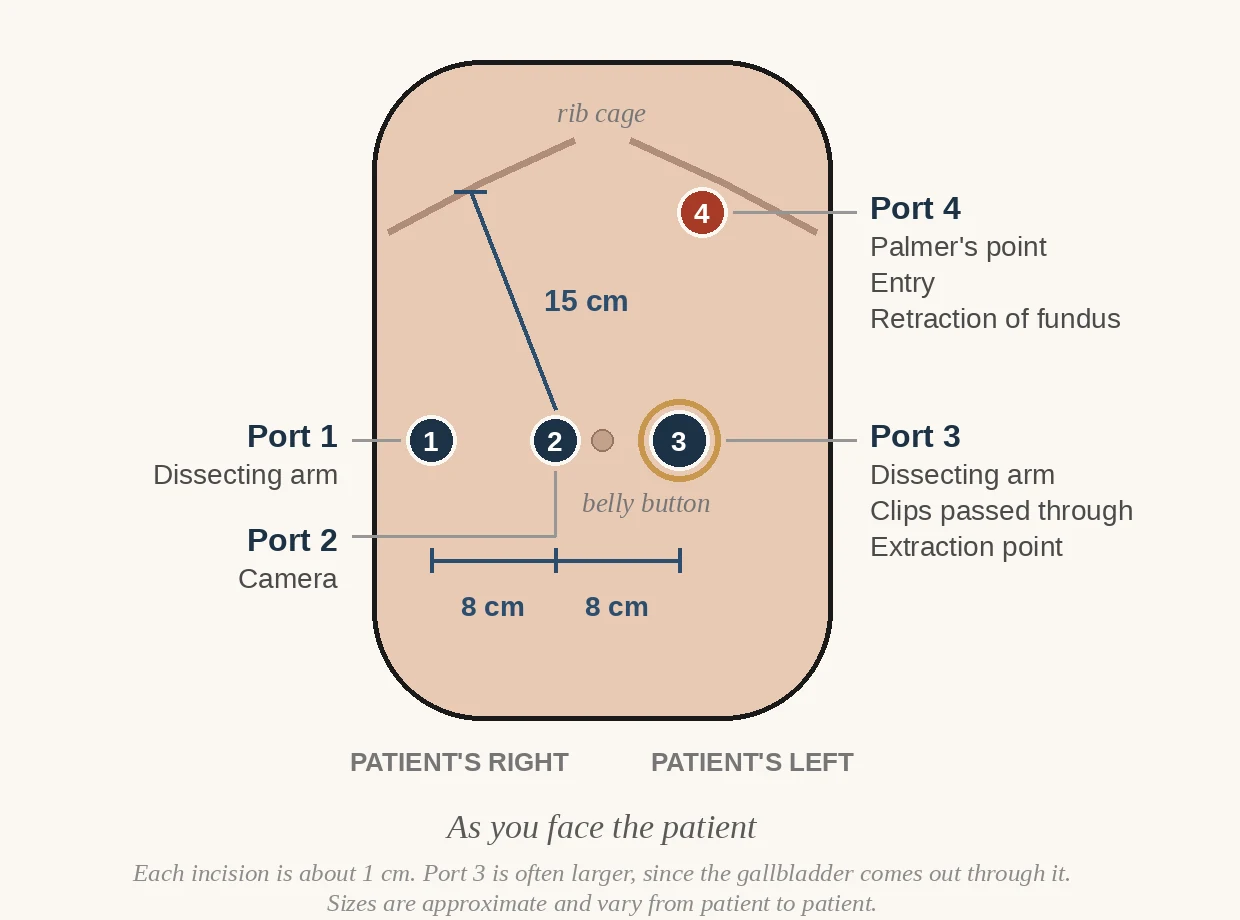
I perform gallbladder surgery robotically, and my layout is different (Figure 2). Four incisions, usually not more than an inch. One sits high on the left under the ribs. The other three run across the abdomen at about the level of the navel, 8 cm apart. The camera goes through the middle one of those three, 15 cm down from the right rib margin. The one to the patient's left at navel level, port 3, is where the gallbladder eventually comes out, so it is often a little larger than the others. When the stones inside are large, that incision has to be larger still to let the gallbladder through.
Step 2: Getting in
The first incision I make is the one high on the left under the ribs, at a spot surgeons call Palmer's Point, about 2 to 3 cm below the rib margin. I enter there in almost every case, because that part of the abdominal wall is almost always free of scar tissue from earlier operations, and scar tissue is what makes the first entry dangerous.
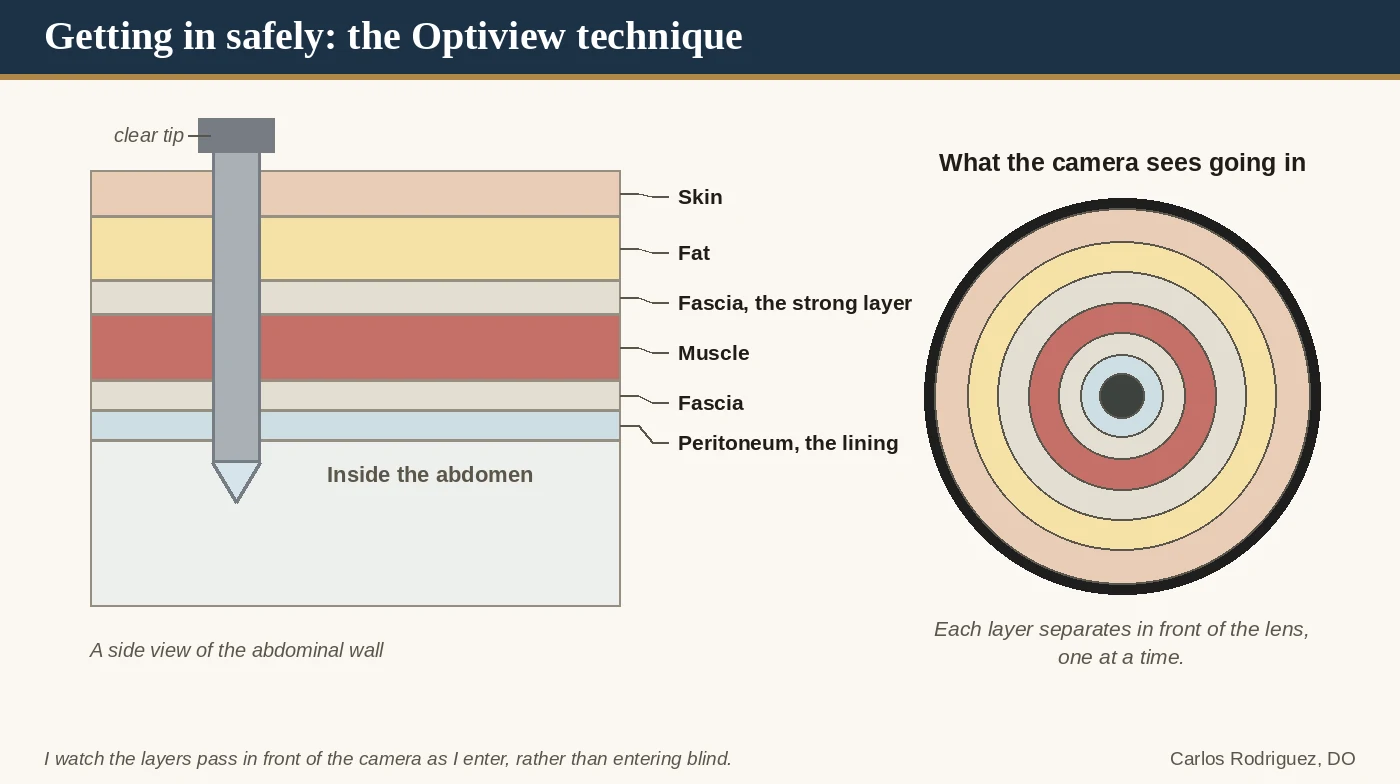
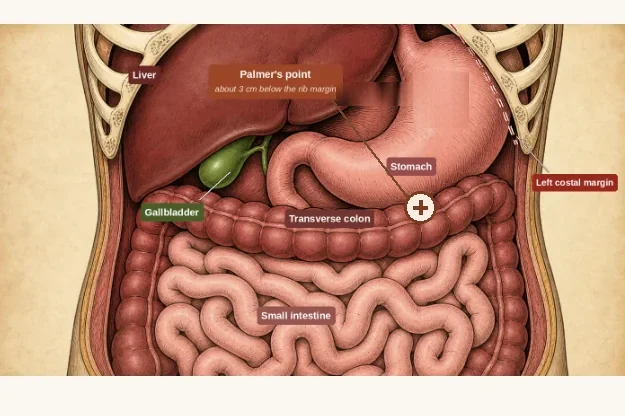
I enter under direct vision through a 5 mm port I can see through, and watch each layer of the abdominal wall pass on the screen rather than pushing in blind (Figure 3). The first thing I do upon entry is to insufflate the abdomen (fill it with gas) to 15 mm Hg with carbon dioxide. Then, I look at what lives directly beneath the entry site, to confirm nothing was touched on the way in (Figure 4). Ports 1, 2, and 3 are then placed and port 4 is upsized to an 8 mm robotic port. I posted a short animation of the port setup on LinkedIn if you want to see the sequence.
Once safely in the abdomen, I rotate the table 5 degrees to the left and tilt the whole table 15 degrees up.¹ Gravity does part of the work. In that position the stomach and intestines fall away from the liver, and the gallbladder comes into view instead of being buried under everything else.
Step 3: The first look
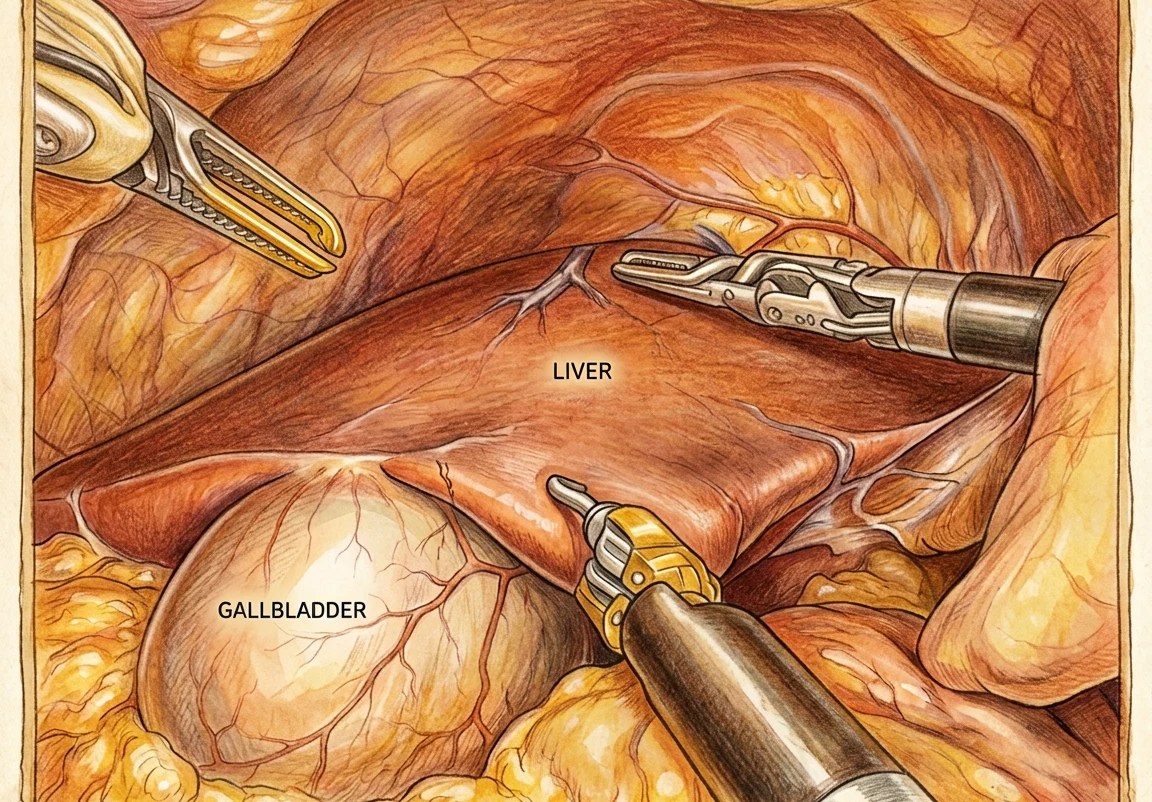
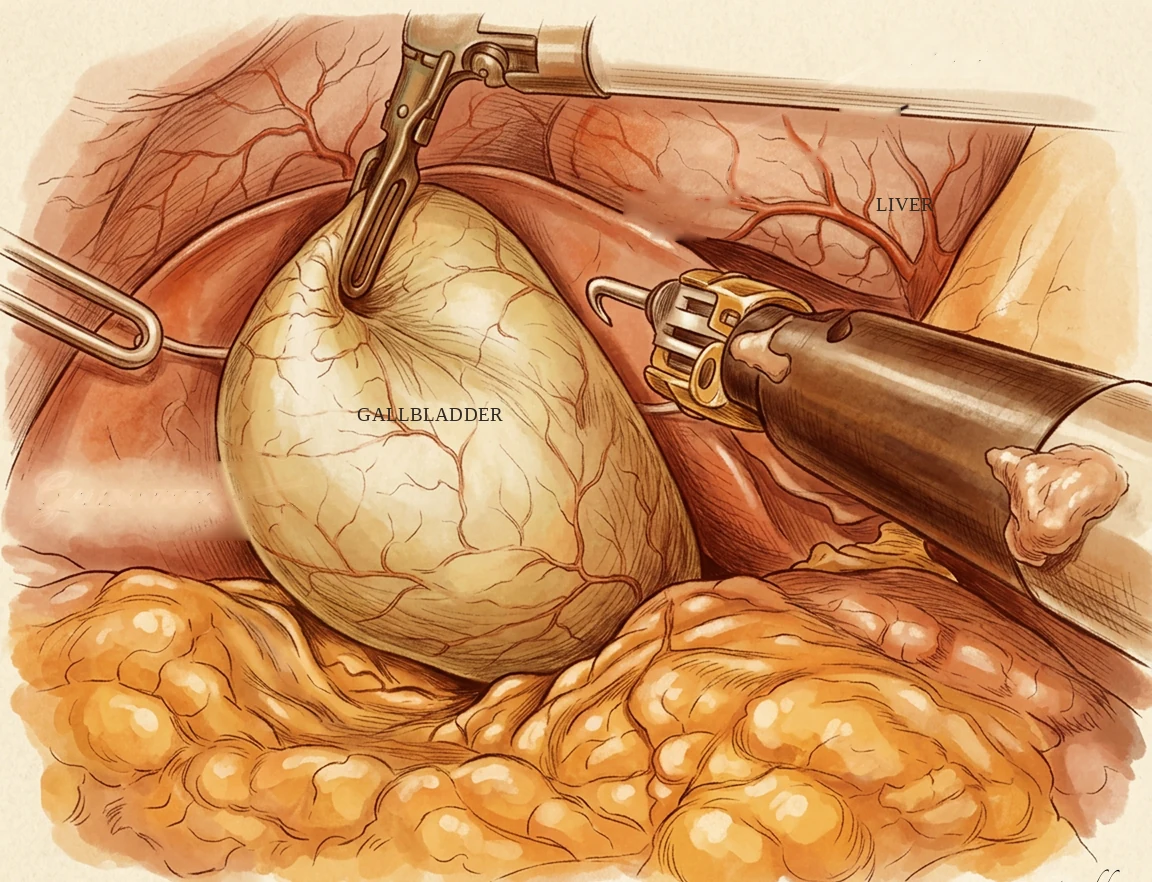
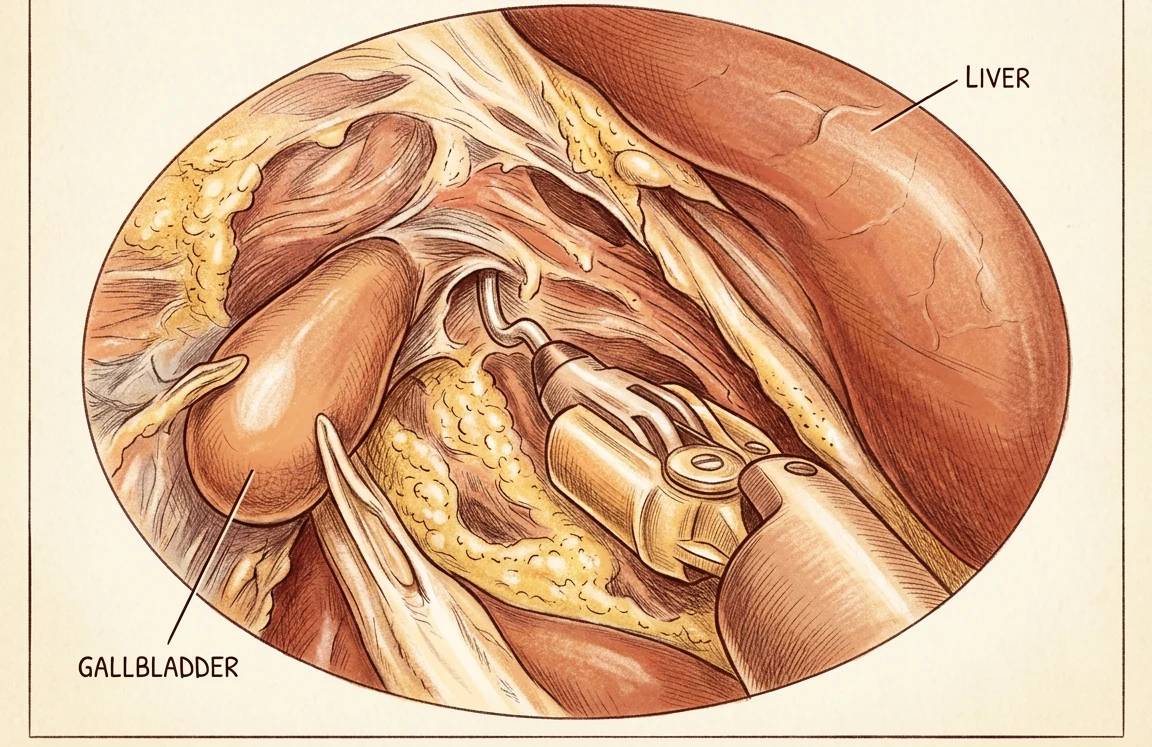
The gallbladder sits tucked under the edge of the liver, and at the start of the case most of it is hidden (Figure 5). I grasp the top of the gallbladder (the fundus) and fold it up over the edge of the liver, toward the right shoulder (Figure 6).¹ That one move opens the working space for the rest of the operation.
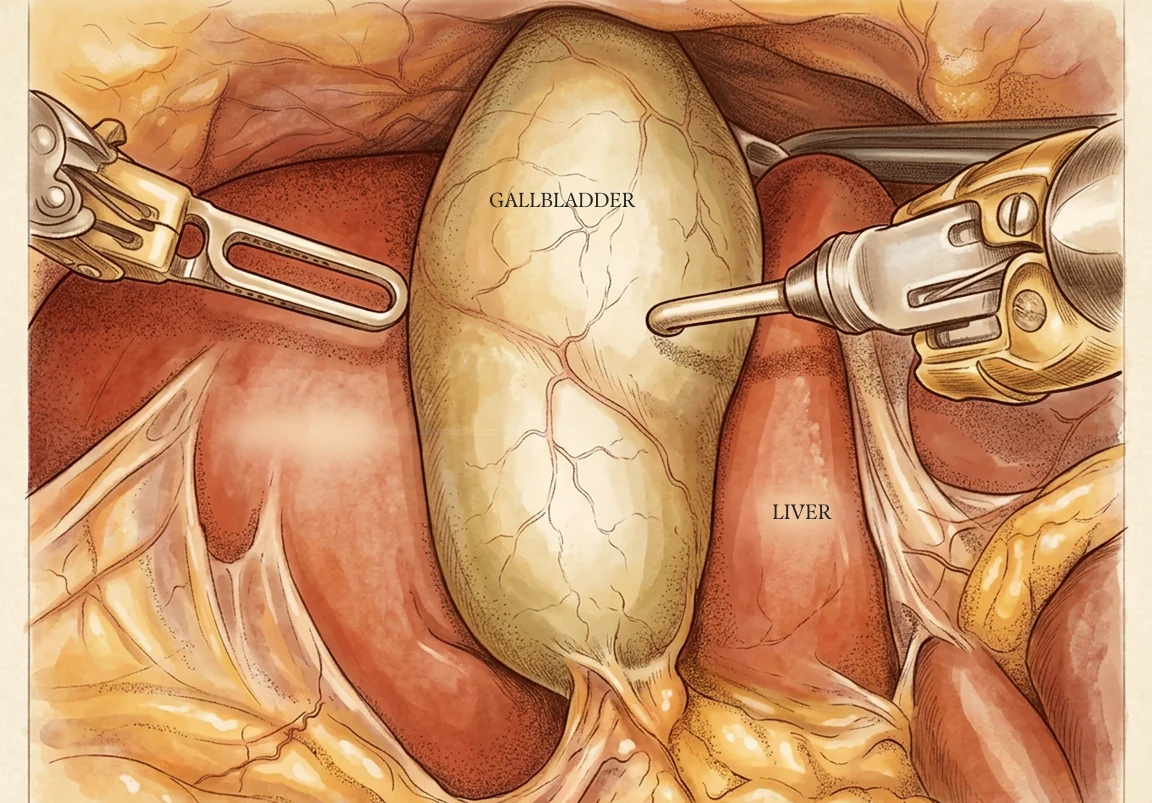
Then I pull the neck of the gallbladder out to the side. That stretches the tissue between the gallbladder and the liver, and it separates the cystic duct from the main bile duct that runs behind it. Everything that follows happens in the small space this exposes (Figure 7), which surgeons call the hepatocystic triangle, or Calot's triangle.
Step 4: The duct and the artery
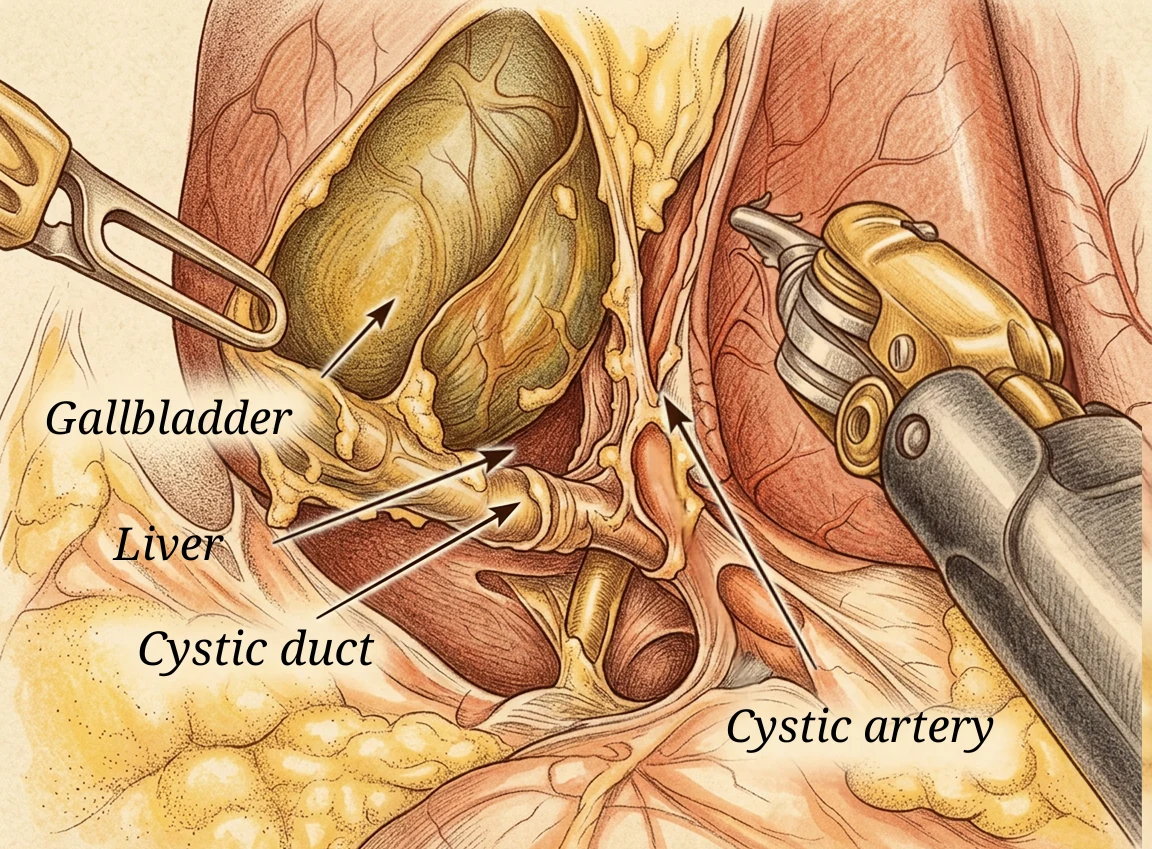
The gallbladder connects to the rest of the body through two structures, the cystic duct and the cystic artery. Both run through the hepatocystic triangle, wrapped in fat and fibrous tissue.
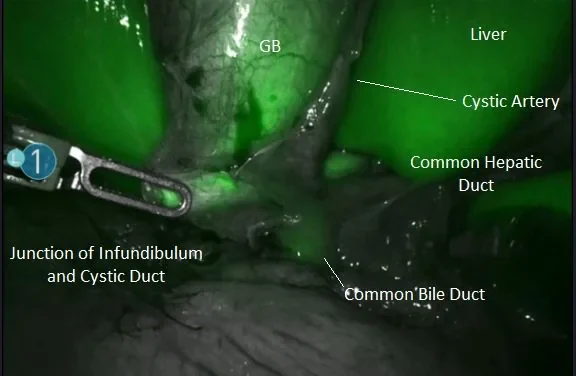
I clear that tissue away until the two structures are clean and visible (Figures 8 and 9). Then each one is closed with clips and divided between the clips. It is the step that decides whether a gallbladder case takes twenty minutes or two hours, because nothing gets clipped and nothing gets cut until I am certain which structure is which. Achieving the critical view of safety is how I get to that certainty. That and what I do when anatomy is difficult to discern is what I plan to cover next week.
Step 5: Off the liver and out
Once the duct and artery are divided, the gallbladder is still attached to the liver along its whole length. It sits in a bed on the underside of the liver, held there by a fibrous layer called the cystic plate. That layer is where I lift the gallbladder away, using an energy instrument that cuts and seals at the same time (Figure 10). Staying in the correct plane matters. Too shallow and the gallbladder opens. Too deep and you are in liver tissue that bleeds. Small bleeding points in the bed are sealed as I go.
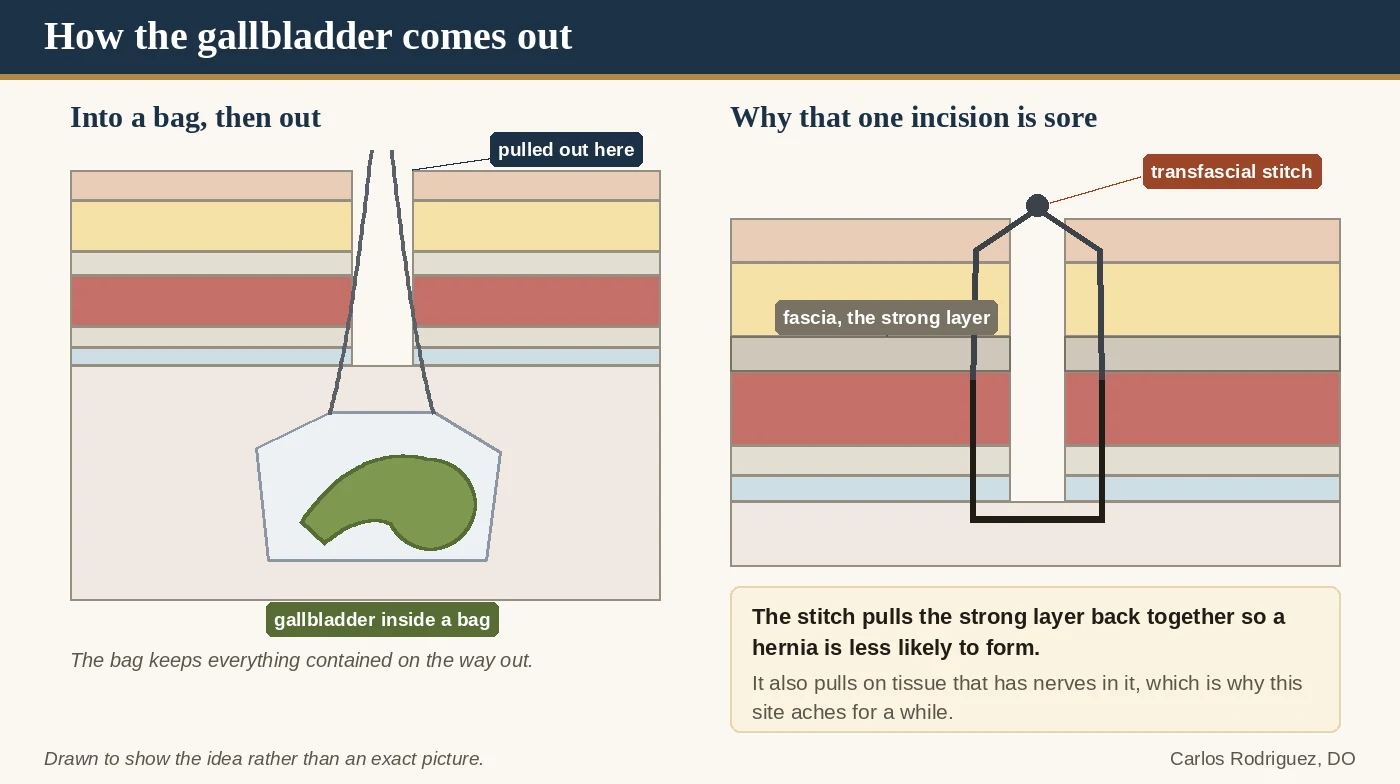
The gallbladder then goes into a retrieval bag inside the abdomen (Figure 11), and the bag comes out through the incision to the left of the patient's navel (port 3).
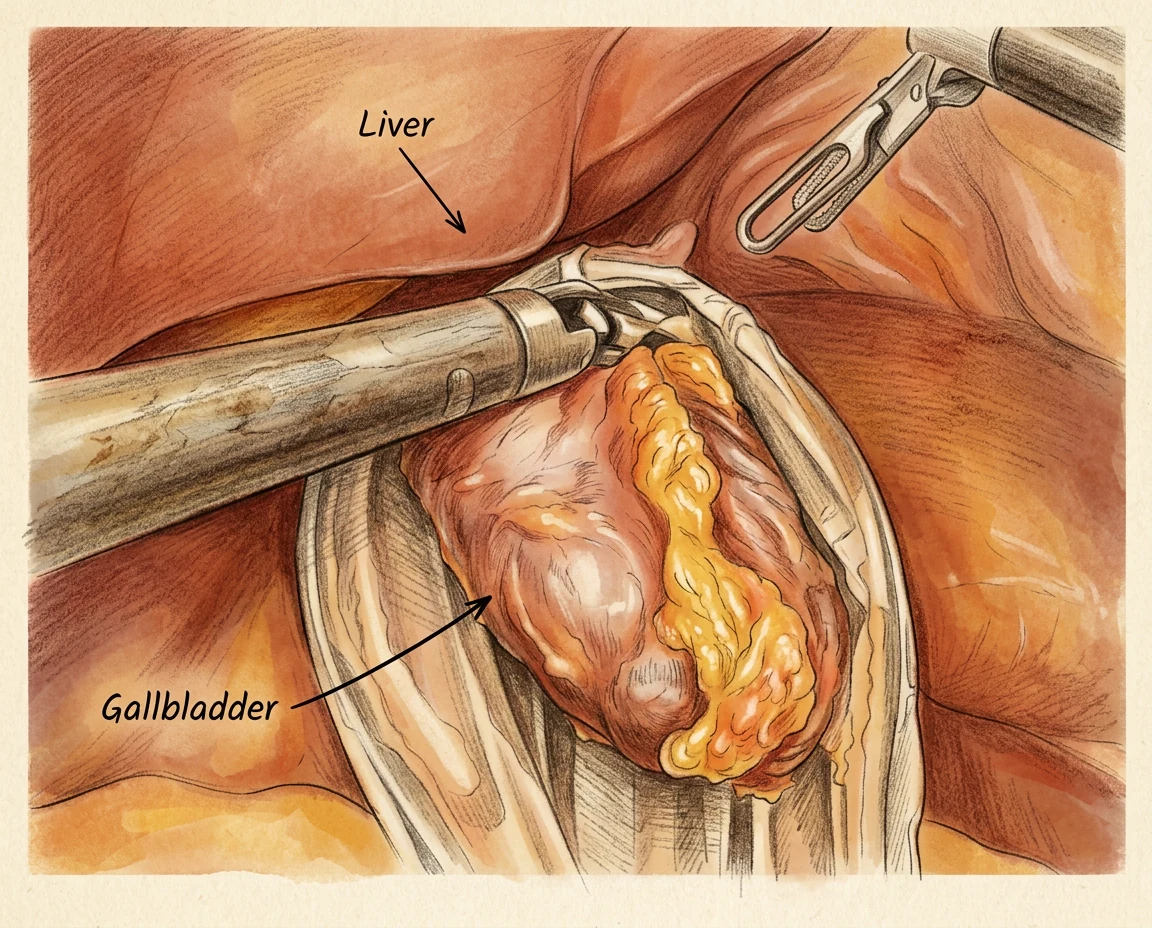
The gallbladder is often inflamed and thin-walled, and it can tear during the dissection. Placing it into a retrieval bag can help minimize the risk of it tearing, spilling stones, or contaminating local tissue during its removal from the abdomen. A 2022 systematic review reports gallbladder perforation in 6 to 40 percent of laparoscopic cholecystectomies, with stones spilling into the abdomen in about 16 percent.² Most spilled stones never cause a problem. When they do, the usual result is an abscess. Of the 85 published cases collected in that review, abscesses accounted for 56.5 percent of the complications, the median time to symptoms was 36 months, and symptoms appeared anywhere from the second day after surgery to 15 years later.² Most of those patients needed another operation. That is why I retrieve stones when they spill, and why the specimen comes out in a bag rather than bare.
Typically the extraction incision is widened slightly to let the gallbladder through, and its deeper layer, the fascia, is closed with a stitch to prevent a hernia forming (Figure 12).¹ That stitch is the reason this incision stays sore longer than the other three. The skin is closed and covered.
Going home
Most patients having a planned gallbladder operation go home the same day.
A Cochrane review of six randomized trials compared same-day discharge with an overnight stay after laparoscopic cholecystectomy. There was no significant difference in serious adverse events between the two groups (rate ratio 3.24, 95 percent confidence interval 0.74 to 14.09), in readmission, or in quality of life, and the review concluded that day surgery appears just as safe as an overnight stay.³
If you came in with an infected gallbladder, a duct full of stones, or pancreatitis, you will likely stay in the hospital at least overnight.
How safe is this operation now
Cholecystectomy is one of the most common operations performed in the United States, and it has become measurably safer over the past decade.
A study of 516,372 Medicare patients who had minimally invasive gallbladder surgery between 2011 and 2021 found that overall complications fell from 21.5 percent to 16.5 percent, and serious complications fell from 12.3 percent to 7.0 percent.⁴ Bile duct injury, the complication surgeons work hardest to avoid, fell from 0.19 percent to 0.12 percent. That is about 1 in 800 patients in absolute terms, and a 37 percent relative reduction. Bleeding during the operation fell from 1.07 percent to 0.54 percent, and the need for a blood transfusion fell from 5.47 percent to 1.87 percent. All of those changes were statistically significant, at p less than .001.
Two things about that study are worth keeping in mind. Patients got sicker over the same decade, not healthier, and the share of unplanned admissions rose from 78.8 percent to 90.1 percent.⁴ The results improved anyway. This was also an older hospitalized population, with an average age of 74.8 years, so the numbers are not a direct match for a healthy 40-year-old having a planned operation. If anything, that patient's risk is lower.
What I want you to take from this
The operation is short, the incisions are small, and most patients go home the same day. What makes it safe is the middle part, the slow part, where the surgeon does not cut anything until the anatomy is proven. That is next week.
For more on gallbladder disease and when removal is recommended, see my gallbladder patient guide. Missed the earlier posts in this series? You can find them all on the blog.
Up next: Part 5. How surgeons keep the bile duct safe. The critical view of safety, fluorescence imaging with indocyanine green, and subtotal cholecystectomy: what I do when anatomy is difficult to discern.
About the author. Carlos Rodriguez, DO, MBA, FACS is a board-certified general surgeon and surgical intensivist at Texas Health Fort Worth, and a Navy veteran. He has performed cholecystectomy robotically since May 2022.
Disclosure. Dr. Rodriguez served as a speaker and educator for Intuitive Surgical through June 2025. He has no current financial relationship with the company.
This article is for education and is not medical advice.
References
1. Asad U, Wang CF, Jones MW. Laparoscopic Cholecystectomy. In: StatPearls. Treasure Island (FL): StatPearls Publishing; updated July 2, 2025. https://www.ncbi.nlm.nih.gov/books/NBK448145/
2. Gavriilidis P, Catena F, de'Angelis G, de'Angelis N. Consequences of the spilled gallstones during laparoscopic cholecystectomy: a systematic review. World J Emerg Surg. 2022;17(1):57. https://doi.org/10.1186/s13017-022-00456-6
3. Vaughan J, Gurusamy KS, Davidson BR. Day-surgery versus overnight stay surgery for laparoscopic cholecystectomy. Cochrane Database Syst Rev. 2013;2013(7):CD006798. https://doi.org/10.1002/14651858.CD006798.pub4
4. Mullens CL, Sinamo JK, Hallway A, Sheetz KH, Ehlers AP, Telem DA. Contemporary Outcomes of Cholecystectomy. JAMA Surg. 2026;161(4):398-405. https://doi.org/10.1001/jamasurg.2025.6865
5. Spanos CP, Syrakos T. Bile leaks from the duct of Luschka (subvesical duct): a review. Langenbecks Arch Surg. 2006;391(5):441-447. https://doi.org/10.1007/s00423-006-0078-9
6. Lockhart S, Singh-Ranger G. Rouviere's sulcus: aspects of incorporating this valuable sign for laparoscopic cholecystectomy. Asian J Surg. 2018;41(1):1-3. https://doi.org/10.1016/j.asjsur.2016.07.012